Getting Started with DineKit
How to install DineKit and get your first restaurant menu live in minutes — requirements, activation, the setup wizard, and where everything lives.
DineKit is a free, open-source restaurant operating system that runs on your own WordPress site. This guide covers everything in the v1.1 release — menus and allergens, bookings, commission-free online ordering, card payments, a full point-of-sale, staff & rota, events, guest CRM and reviews — and shows you how to get from a fresh install to a working setup.
Before you start
- A WordPress site you can install plugins on (self-hosted or a host that allows plugin installs — not the free wordpress.com tier).
- Admin access to that site’s Plugins screen.
- Optional: your own Stripe account, if you want to take online payments or booking deposits. DineKit works fully without one — ordering, bookings, POS cash sales, menus and everything else run with no Stripe connected. You only need it for card/Apple Pay/Google Pay payments.
- A rough idea of your business type (dine-in, takeaway, delivery, or a mix) — the setup wizard asks this and tailors what it shows you, but nothing is locked in; you can change it all later.
Step by step
- In your WordPress dashboard, go to Plugins > Add New Plugin and search for “DineKit”.
- Click Install Now, then Activate. (You can also download the zip from /download/ and upload it via Plugins > Add New Plugin > Upload Plugin.)
- Activation launches the first-run setup wizard automatically. Answer the business-type question (dine-in, takeaway, or both) — DineKit uses this to show you only the relevant menu items to start with.
- When the wizard offers to create your menu, order and booking pages for you, let it — it drops ready-made pages onto your site using the DineKit block/shortcodes, so there’s nothing to build by hand.
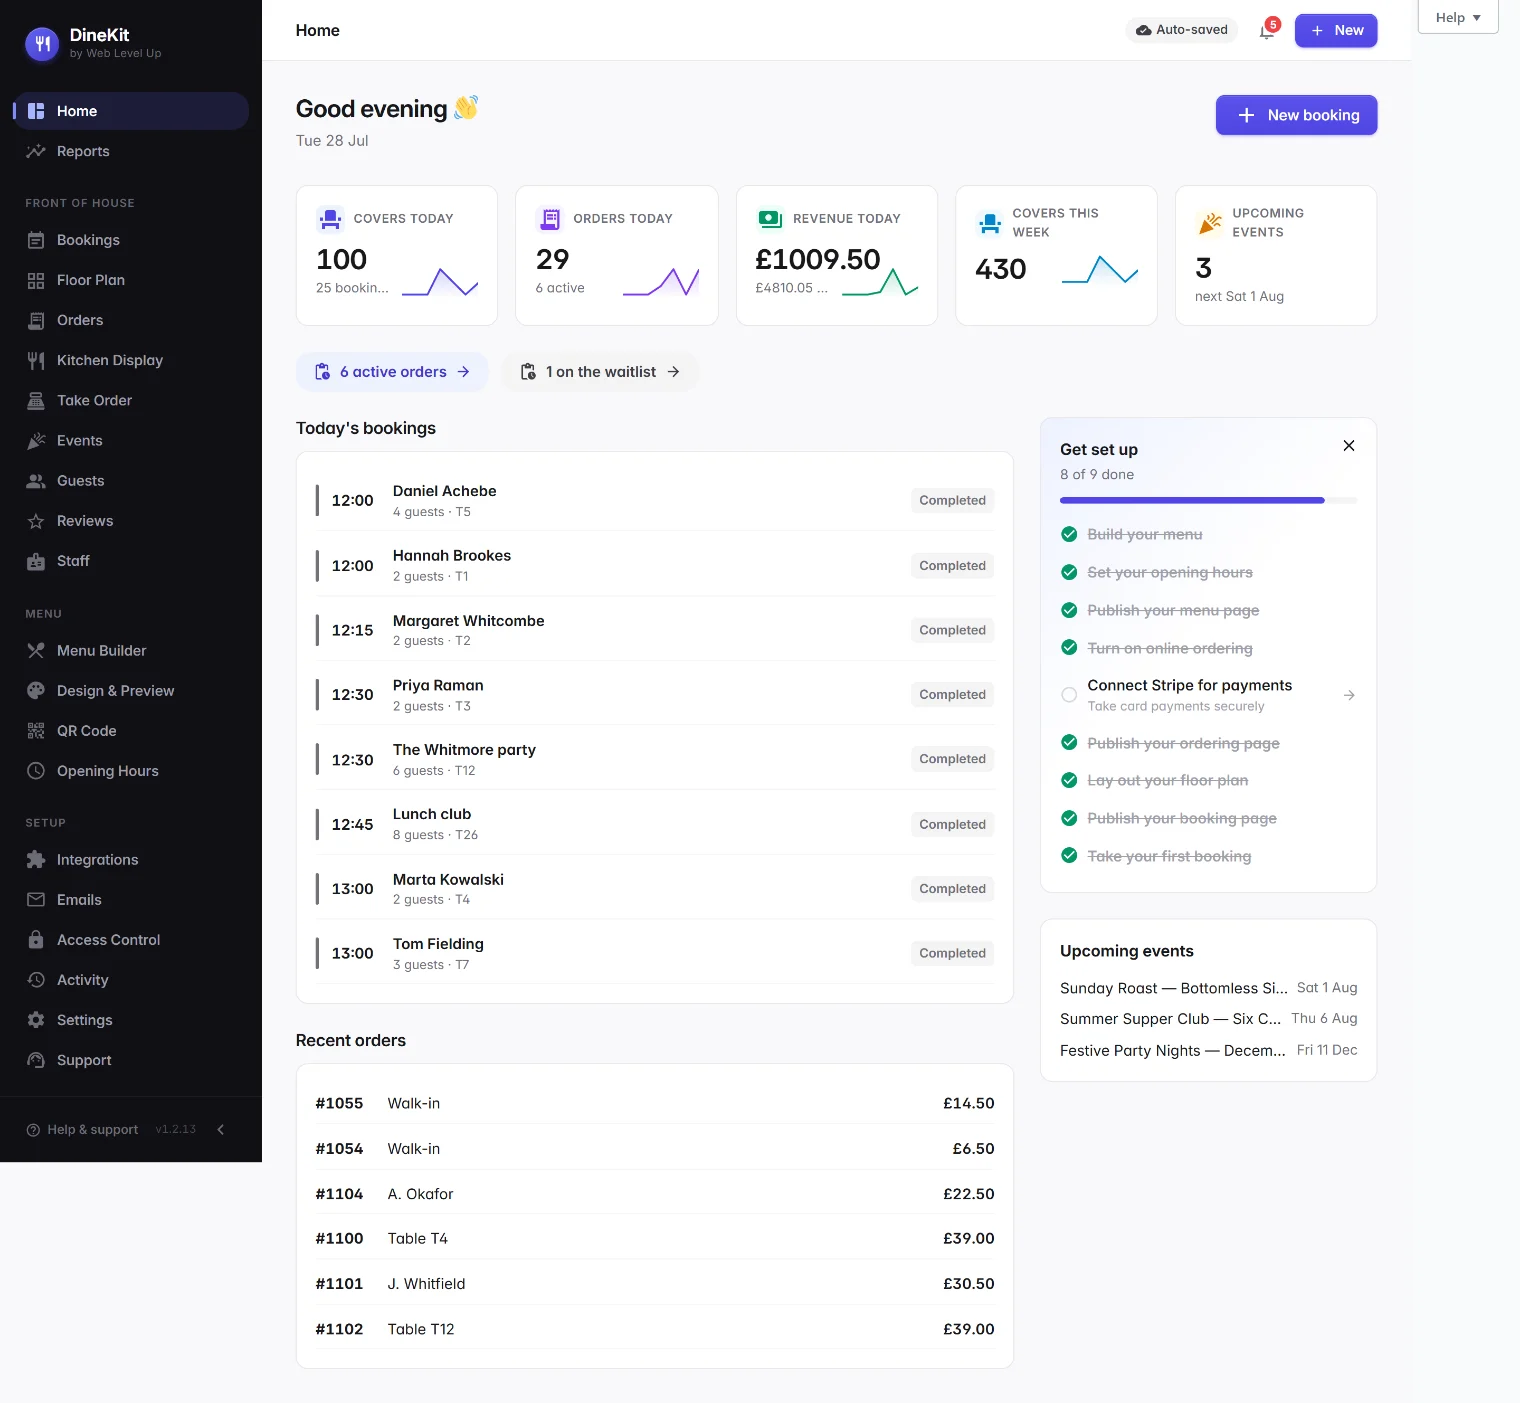
- You’ll land on the DineKit dashboard, where a “Getting started” checklist walks you through the first real setup tasks (see below).
- Add your menu items and the 14 UK allergens against each dish — see Building your menu and Allergens.
- Set your Opening Hours (Restaurant > Opening Hours in the DineKit menu) — bookings and ordering availability are both driven from this.
- Turn on the modules you need: bookings, online ordering, the POS, staff rota, events, and reviews. Each has its own guide linked at the bottom of this page — work through them in whatever order matches how you run service.
- If you want card payments or deposits, connect your Stripe keys under Integrations — see Take card payments.
Everything DineKit can do today
All of the following is free, live in the current release, and runs on your own site — there’s no per-order commission and no plan to upgrade to:
- Menus & QR codes — unlimited menus and sections, dish photos, print-ready QR table cards. See Building your menu.
- All 14 UK allergens — Natasha’s Law-ready allergen tagging per dish, plus a printable allergen matrix. See Allergens.
- Opening hours — one source of truth that drives both booking availability and ordering hours.
- Table bookings — a drag-and-drop floor plan, joinable tables, live availability, a waitlist, and optional deposits through your own Stripe account. See Take table bookings.
- Commission-free online ordering — eat-in QR order-at-table, takeaway and delivery with your own zones and fees. You keep 100% of every order. See Set up online ordering.
- Card payments — on your own Stripe account, with Apple Pay and Google Pay, for both order payments and booking deposits. See Take card payments.
- A full POS — order pad, open tabs, split bills, cash and card-present payments (Stripe smart reader or pay-by-QR), tips, X/Z cash-up reports and manager-PIN voids/refunds. See Using the POS.
- Staff & rota — staff records and roles, a weekly rota with cost preview, holiday requests, and a live “are we staffed?” dashboard. See Staff and rota.
- Events & pre-orders — group bookings with a shareable link where each guest pre-orders and flags their own allergens ahead of time. See Events and pre-orders.
- Guest CRM — repeat-visit tracking, VIP tags, and allergy/dietary notes carried across bookings and orders. See Guest CRM.
- Reviews & retention — automated, compliant post-visit review requests and win-back offers. See Reviews and retention.
What DineKit deliberately doesn’t do: it isn’t a diner-discovery marketplace (it won’t bring you new customers the way a booking network does), it doesn’t supply delivery drivers, and there’s no branded mobile app — it’s a toolkit that runs on the site you already own.
Where to find everything
Once activated, DineKit adds a single DineKit item near the bottom of your WordPress admin sidebar. Everything else lives inside that one screen, in its own left-hand navigation:
- Home — your dashboard: today’s covers, orders and revenue, plus the getting-started checklist.
- Reports — trends and top dishes over time.
- Bookings and Floor Plan — the booking diary and your table layout.
- Orders and Take Order — the kitchen order board and the POS order pad.
- Events, Guests and Reviews — pre-order events, the guest CRM and review requests.
- Staff — people, rota and holiday requests.
- Menu Builder, Design & Preview, QR Code and Opening Hours — everything to do with your menu.
- Integrations — your Stripe keys.
- Emails, Access Control, Activity and Settings — notifications, staff permissions, an audit log, and general settings.
Only business-type-relevant items show up at first (a takeaway-only setup won’t be cluttered with booking screens) — but nothing is hidden for good, so switch business type in Settings any time your operation changes.
The first-run setup wizard
The wizard appears automatically the first time you open DineKit after activating. It asks what kind of business you run (dine-in, takeaway, or both) so it can tailor the admin menu to what you actually need, and it offers to auto-create the WordPress pages you’ll need for your menu, online ordering and bookings — using DineKit’s own block and shortcodes, so they work out of the box. Every choice the wizard makes is just a starting point and can be changed later from Settings. If you ever want to run it again — for example after switching business types — ask whoever manages your site to reset it (it’s a single stored option).
Your getting-started checklist
The DineKit dashboard (Home) shows a “Getting started” checklist that tracks your real progress, not just clicks — each item ticks itself off once the underlying setup actually exists:
- At least one menu item added.
- Opening hours set.
- A table added to your floor plan.
- A booking taken.
- Your menu page created.
- Online ordering switched on.
- Your order page created.
- Your booking page created.
- Stripe connected.
Work through it at your own pace — it’s a guide, not a gate, and every feature works whether or not you’ve ticked every box.
Tips
- You don’t need Stripe to start taking bookings or orders — connect it later, whenever you’re ready to take card payments or deposits.
- If you skip the wizard’s auto-created pages, you can always add the DineKit block or shortcode to any page yourself later.
- Print your QR table cards once your menu is in good shape — they double as the entry point for order-at-table.
- Each admin screen inside DineKit has its own short guided tour on first open (look for “Got it” / “Don’t show tips”) — use those alongside this guide for screen-by-screen help.
- Everything in DineKit is free and self-hosted on your own site — there’s no subscription, no per-order commission, and no feature paywall.