How to take table bookings
Set up a booking page, your floor plan, availability and deposits in DineKit, then manage reservations from the diary — free, with no per-cover fees.
DineKit’s Bookings module turns your site into a proper reservations system: a public booking form for diners, a floor plan of your real tables, and a diary where your team takes, moves and confirms reservations. There’s no per-cover fee and nothing to subscribe to — it runs entirely on your own WordPress site.
Before you start
- DineKit is installed and active on your site (see Getting started).
- Your Opening Hours are set up — Bookings uses these to work out your lunch/dinner service periods automatically.
- If you want to take deposits to cut no-shows, you’ll need your own Stripe account connected first — see Take card payments.
- A few tables and a zone or two already sketched out helps, but you can also build your floor plan as you go.
Step by step
- In wp-admin, open DineKit > Bookings. If you ran the setup wizard and switched on reservations, your booking page and floor plan starter tables already exist — you can skip straight to Booking Settings.
- If you don’t have a booking page yet, either use the dashboard’s “getting started” checklist to auto-create one, or add a new WordPress page and insert the DineKit Booking block (or paste the
Book a table
- Back in Bookings, click the gear icon to open Booking Settings. This is a full-page settings view with a live preview of the public widget; “Back to diary” returns you to the day-to-day view.
- Set your maximum party size (the largest table a diner can request online) and minimum party size (so, say, tables of 8+ aren’t clogged up with solo diners booking through the widget).
- Set the slot interval — how often booking times are offered (e.g. every 15 or 30 minutes; DineKit allows as tight as 5 minutes).
- Set the turn time (how long you expect a table to be occupied) and a buffer either side for clearing/resetting. These two numbers directly control what DineKit will offer as available — get them close to reality or you’ll under- or over-book yourself.
- Check your service periods. These aren’t set separately — they’re pulled straight from your Opening Hours (lunch, dinner, closed days, holiday overrides), so the booking widget only ever offers times you’re actually open. If Opening Hours aren’t set for a day, Booking Settings’ own open/close time is used as a fallback.
- Set a covers-per-hour cap if you want a hard ceiling on how many diners can be seated in any given hour, independent of table count — useful if your kitchen, not your seating, is the bottleneck. Once a slot hits the cap the public widget waitlists new requests, though staff can still override the warning from the diary.
- Set your deposit rules if you’re taking deposits (see below), and decide whether new bookings should auto-confirm or arrive as pending for a member of staff to approve first.
- Finish with widget branding — accent colour, corner radius, and a light or dark style so the public form matches your site rather than looking bolted on.
Building your floor plan
Your floor plan is what makes availability real — DineKit checks actual tables, not just a headcount.
- Open DineKit > Floor Plan and add a zone/area for each distinct part of your venue (Restaurant, Bar, Terrace, Private Room…).
- Within a zone, add tables: give each a seat count and a shape (round, square, rectangular), then drag it into position and rotate it to match your actual room.
- For big parties, join tables into a combo so two or more tables can be offered together as one larger booking unit. DineKit’s best-fit assignment reserves joined tables for parties that actually need them, rather than burning a big combo on a table for two.
- If a table is broken, being repaired, or otherwise unusable, mark it out of service — it greys out with a wrench badge and drops out of availability and combos until you switch it back on.
- Prefer a list to a map? Toggle to the list view to see every table by zone with its seats, party fit, and any joined/out-of-service badges — handy for a quick audit.
Taking and managing bookings
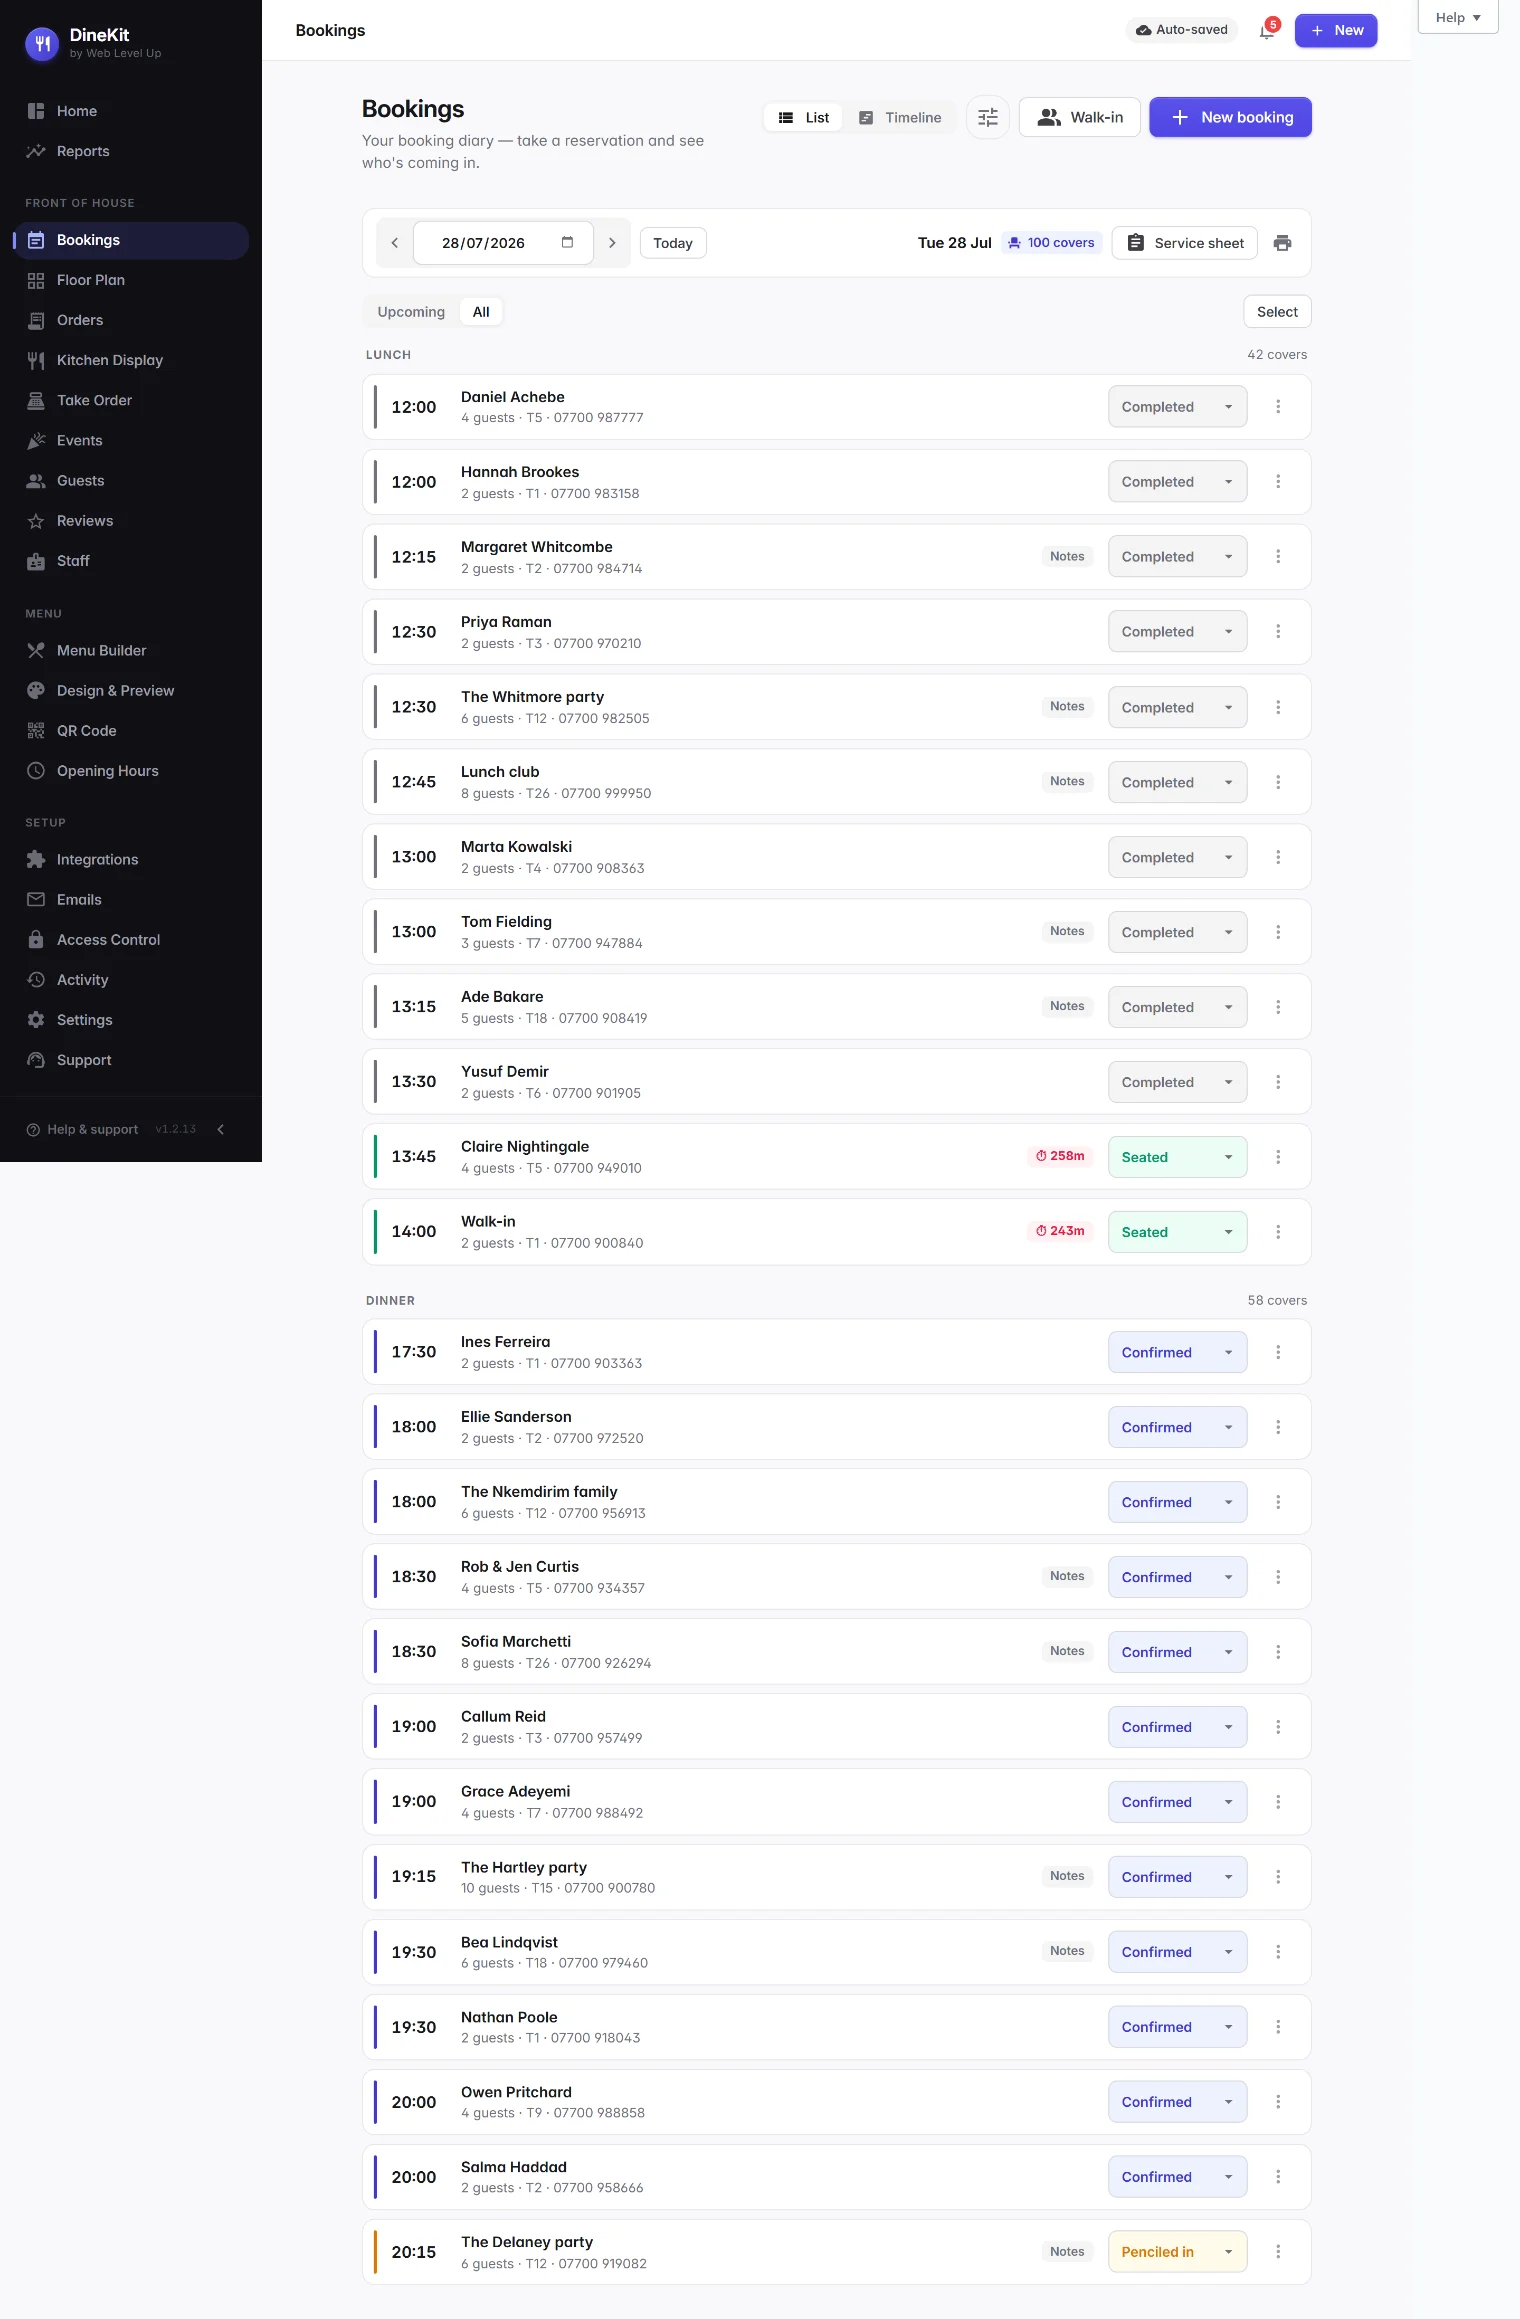
The diary is your day-to-day view of reservations, with each booking showing a status (pending, confirmed, seated, completed, cancelled, and so on) so front-of-house always knows where things stand.
- For a running-the-floor view, switch from the diary list to the full-width timeline — tables run down the left by zone, the day’s clock runs across the top, and each booking appears as a coloured block sized to its turn time. Collapse the sidebar to a slim icon rail for maximum screen during service.
- Click an empty slot on the timeline to open a new booking pre-filled with that time and table.
- Use Walk-in to seat someone on the spot without going through the online form.
- If a requested time is fully booked, DineKit offers “next free” suggestion chips — the nearest available times within a configurable window — both on the public widget and in the admin New Booking form, so a “we’re full” doesn’t have to be a lost booking.
- Click any booking to open its detail view: guest, party size, deposit/payment status, notes and a full history of what happened to it.
The waitlist
When every table for a requested time is taken (or the covers-per-hour cap is hit), the public booking widget offers to add the diner to the waitlist instead of a hard no. Waitlisted requests sit alongside confirmed bookings in your diary as penciled-in, so staff can see the extra demand and manually confirm one if a table frees up or a cancellation comes in.
Deposits, to cut no-shows
DineKit can require a deposit for a booking — a straightforward way to cut no-shows on your busiest slots or biggest tables. Deposits are taken through your own Stripe account (never DineKit’s), on-site with no redirect to another page, so set up Take card payments first if you haven’t already: see Take card payments. Once Stripe is connected, set your deposit threshold and amount in Booking Settings; a paid deposit is what promotes a booking from pending to confirmed. If a deposit-paid booking is later cancelled, DineKit handles the refund and flags it in the booking’s history rather than leaving it unresolved.
Automatic emails
DineKit sends the diner a confirmation email as soon as their booking is made (and confirmed, if it needed approval), plus a cancellation email if the reservation is cancelled or voided. Your team can also see a send log per booking so a failed email doesn’t go unnoticed. If you’re not seeing emails arrive, check your host’s outgoing mail (SMTP) setup first — that’s the most common cause, not DineKit itself.
Tips
- Set Opening Hours before Booking Settings — service periods come from Hours, so an out-of-date lunch/dinner window there will quietly limit what the widget offers.
- Get turn time and buffer right early — they’re the single biggest lever on how many bookings a busy evening can actually hold.
- Use the covers-per-hour cap if your kitchen (not your seats) is the real constraint, and let staff override it from the diary when they know better than the public widget does.
- Mark a table out of service rather than deleting it — deleting or moving a joined table cleans up its combos automatically, which isn’t what you want for a table you’ll bring back next week.
- Turn on auto-confirm once you trust your capacity settings; keep it off (pending-review) while you’re still tuning party sizes and turn times.