How to use the Kitchen Display (KDS)
Run your kitchen from a screen instead of paper tickets: the three-column board, wait timers, coursing, station routing and thermal printing.
The Kitchen Display System (KDS) puts your live orders on a screen in the kitchen instead of on a spike of paper tickets. It is a three-column board — New, Preparing, Ready — that chefs advance with one tap, with wait timers that change colour as a ticket ages so nothing quietly sits there for twenty minutes.
It is included in DineKit at no cost. On most restaurant systems a kitchen display is a paid add-on or a separate screen licence.
What the board shows you
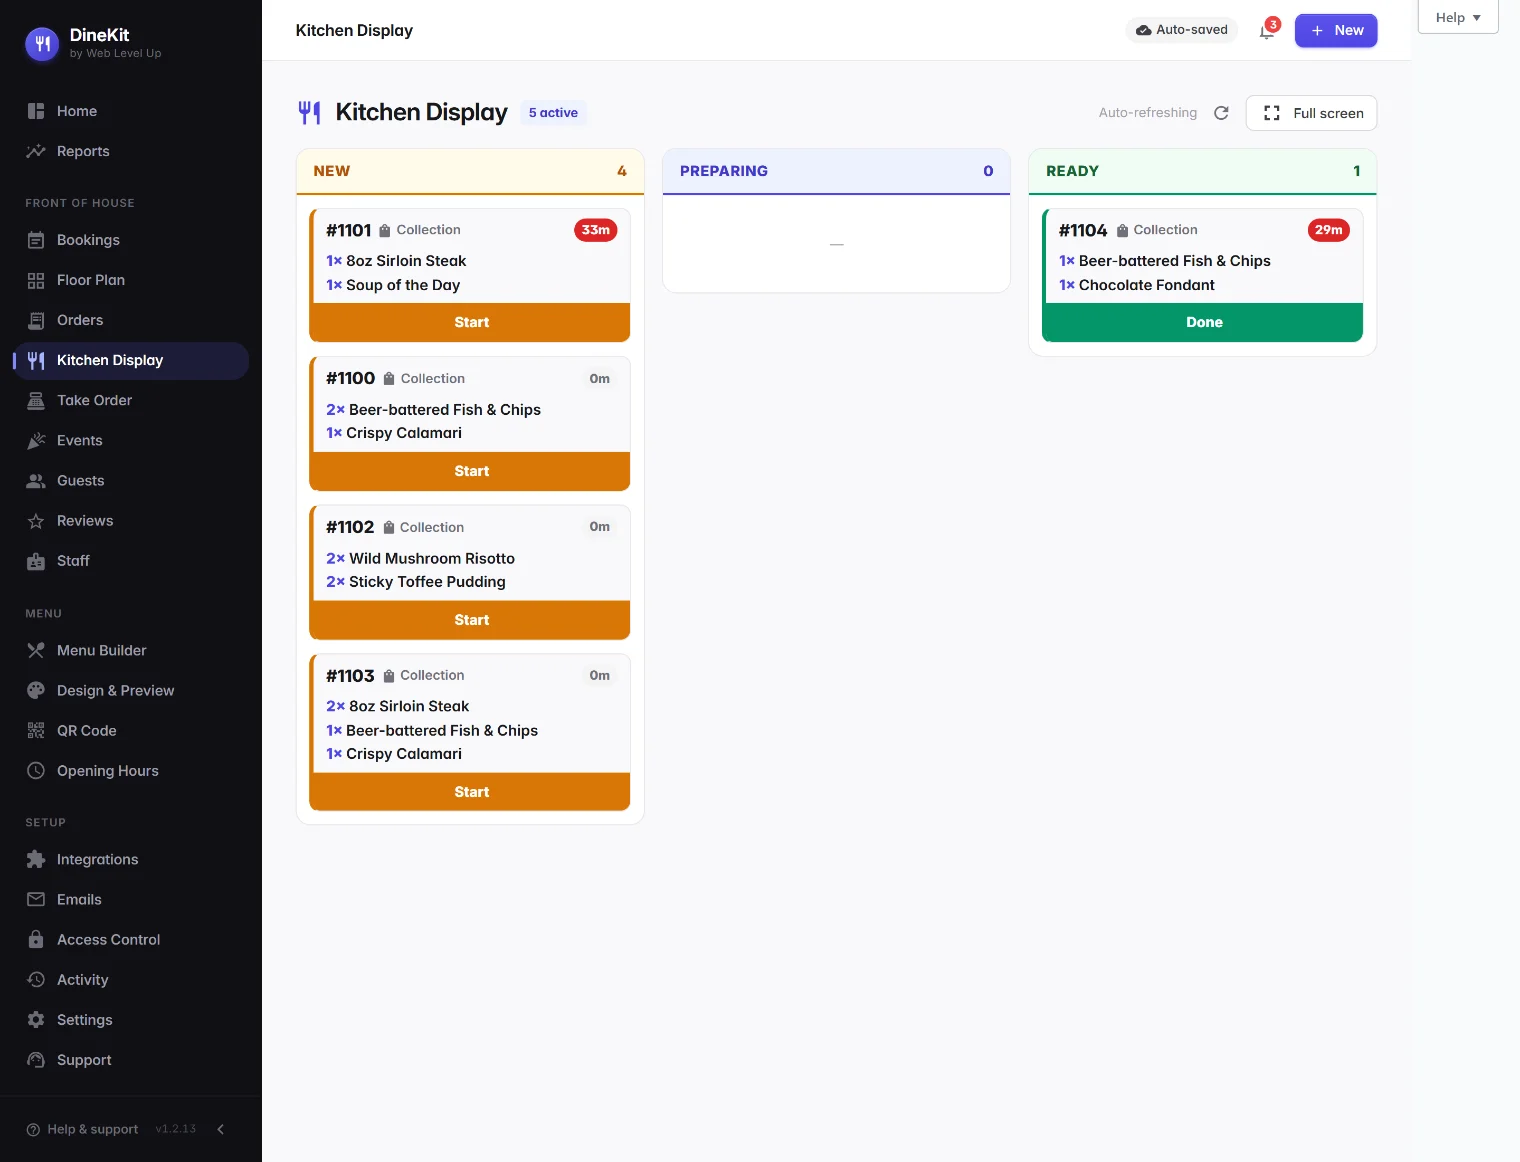
Every ticket on the board carries the information a chef actually needs during service, and nothing else:
- Order number and type — an icon tells you at a glance whether it is eat-in, collection or delivery, so a table order isn’t mistaken for a takeaway going out the door.
- The items and quantities, with any modifiers and removals the guest chose.
- A wait timer that escalates in colour the longer the ticket has been open. A ticket that has just landed reads calmly; one that has been sitting too long turns red and is hard to ignore.
- A single action button — Start, then Done — so a chef with flour on their hands can move a ticket along with one tap.
Before you start
- DineKit installed and active, with your menu built — see Getting started and Building your menu.
- At least one order channel switched on, otherwise no tickets will ever reach the board. Set up online ordering, or take orders on the till — see Using the POS.
- A screen for the kitchen. Any device with a browser will do — an old tablet, a laptop, or a TV with a browser. There is nothing to install.
Step by step: get the board running
- Open the Kitchen Display. In DineKit, choose Kitchen Display from the Front of House group in the sidebar. You will see the three columns, with any live tickets already in place.
- Put it on the kitchen screen. Log in on the kitchen device and open the same screen. If you would rather not sign in to wp-admin on a shared device, install the staff app to the home screen instead — it runs on its own route, separate from the WordPress dashboard.
- Switch to fullscreen. Use the Full screen button in the top right. The DineKit sidebar and the WordPress chrome disappear, leaving just the board — which is what you want on a wall-mounted screen.
- Leave it alone. The board auto-refreshes on its own. There is no need to reload the page between orders, and no need for a member of staff to keep an eye on it.
- Work the tickets. Tap Start when a ticket goes on, which moves it to Preparing. Tap Done when it is ready to leave the pass, which moves it to Ready and then off the board.
Coursing: firing rounds separately
For table service you rarely want the whole order cooking at once. DineKit handles this by treating each round you fire as its own ticket.
When you fire starters from a table, only those items appear on the board. When you later fire mains, they arrive as a separate, independent ticket with its own timer — the starters already cooking are not disturbed, and the kitchen never has to work out which half of a ticket is still outstanding.
One thing worth understanding: when a dine-in round is marked done it leaves the board, but the table’s bill stays open and payable at the till until it is settled. Clearing a ticket from the kitchen screen never closes a tab by accident.
Sending dishes to the right station
Each dish can be routed to a station — typically kitchen or bar. That routing does two useful things:
- Drinks and food can be separated, so the bar isn’t reading food tickets and the kitchen isn’t reading drinks orders.
- When you print, you can choose print all, kitchen only or bar only.
Set a dish’s station in the dish editor under Kitchen & labels when you build the menu.
Printing tickets as well
A screen suits some kitchens; others want paper. You can have both.
- Print on accept — the ticket issues automatically the moment you accept an order, so nobody has to remember to print it.
- Email-to-printer thermal tickets — DineKit can send tickets straight to a network thermal printer that supports Epson Connect or Star CloudPRNT. No computer sits between the order and the printer, and there is buying guidance in the dashboard if you don’t have a printer yet.
Tips from real service
- Mount the screen where the pass can see it, not where the manager can. The timers only help if the person cooking can read them.
- Agree what “Ready” means before you start — plated and under the lamp, or actually taken to the table. The board is only as honest as the habit behind it.
- Don’t leave old tickets on the board. A stale ticket with a red timer trains everyone to ignore red timers, which defeats the point.
- A cheap tablet is enough. The board is a web page; it does not need a powerful device, and there is no per-screen licence to pay.
Related guides
- Set up online ordering — where most KDS tickets come from.
- Using the POS — firing rounds from a table.
- Building your menu — setting each dish’s station.
- Back to the knowledge centre